
[ad_1]
A cloud-based software engineering agent that can work on many tasks in parallel, powered by codex-1. Available to ChatGPT Pro, Team, and Enterprise users today, and Plus users soon.

Today we’re launching a research preview of Codex: a cloud-based software engineering agent that can work on many tasks in parallel. Codex can perform tasks for you such as writing features, answering questions about your codebase, fixing bugs, and proposing pull requests for review; each task runs in its own cloud sandbox environment, preloaded with your repository.
Codex is powered by codex-1, a version of OpenAI o3 optimized for software engineering. It was trained using reinforcement learning on real-world coding tasks in a variety of environments to generate code that closely mirrors human style and PR preferences, adheres precisely to instructions, and can iteratively run tests until it receives a passing result. We’re starting to roll out Codex to ChatGPT Pro, Enterprise, and Team users today, with support for Plus and Edu coming soon.
How Codex works
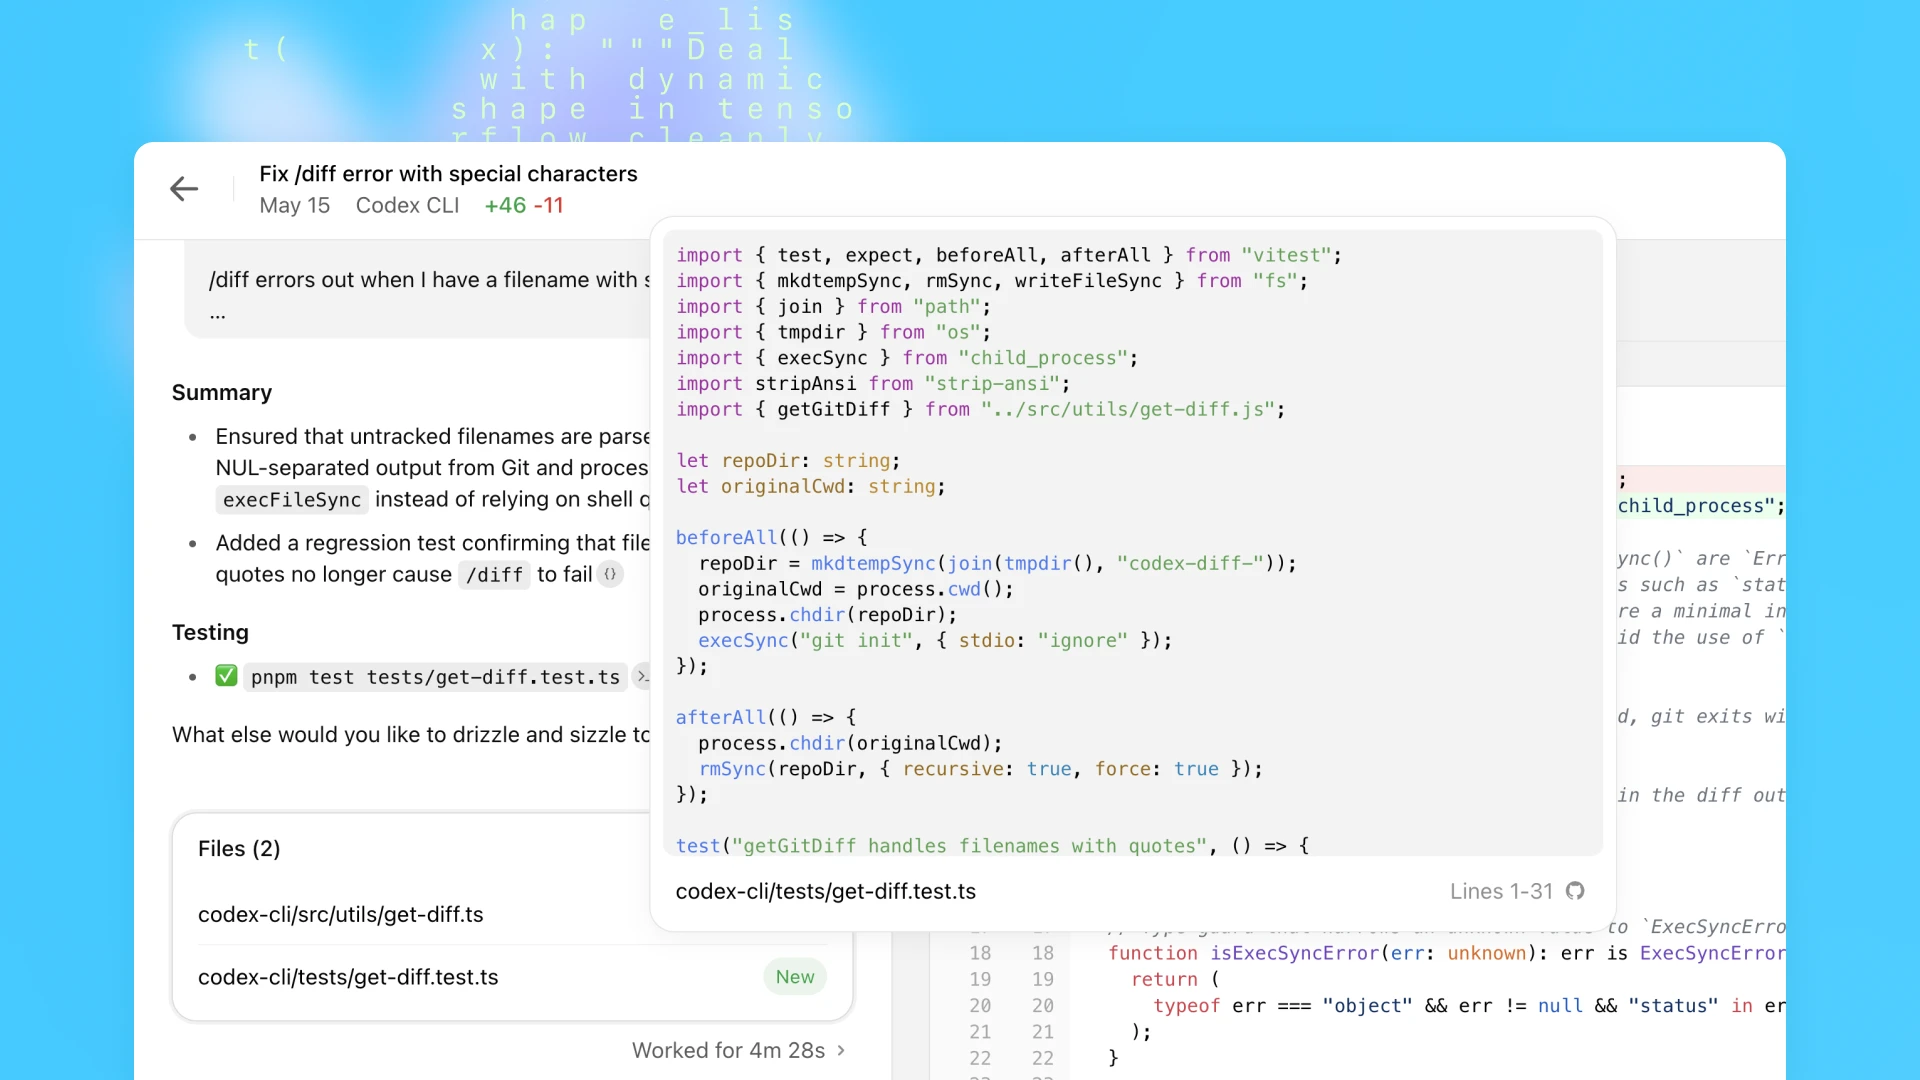
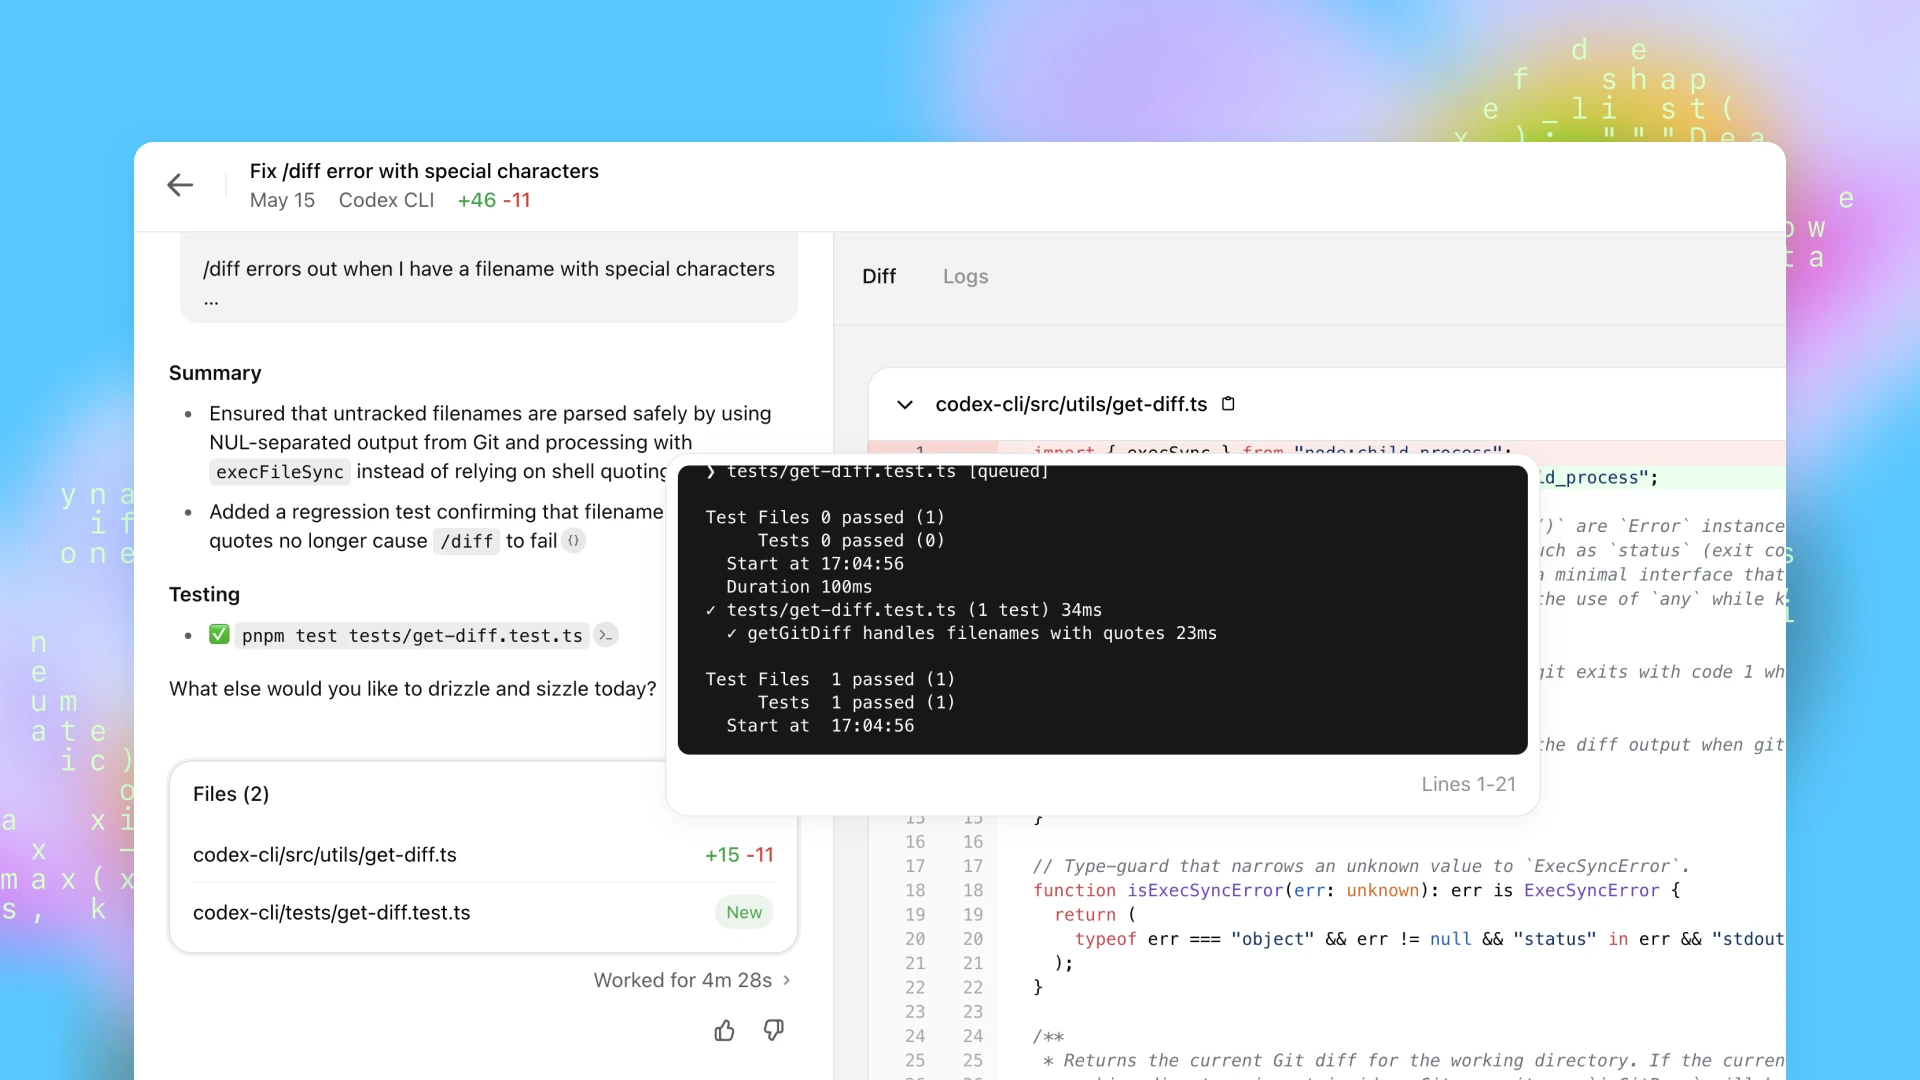
Today you can access Codex through the sidebar in ChatGPT and assign it new coding tasks by typing a prompt and clicking “Code”. If you want to ask Codex a question about your codebase, click “Ask”. Each task is processed independently in a separate, isolated environment preloaded with your codebase. Codex can read and edit files, as well as run commands including test harnesses, linters, and type checkers. Task completion typically takes between 1 and 30 minutes, depending on complexity, and you can monitor Codex’s progress in real time.
Once Codex completes a task, it commits its changes in its environment. Codex provides verifiable evidence of its actions through citations of terminal logs and test outputs, allowing you to trace each step taken during task completion. You can then review the results, request further revisions, open a GitHub pull request, or directly integrate the changes into your local environment. In the product, you can configure the Codex environment to match your real development environment as closely as possible.
Codex can be guided by AGENTS.md files placed within your repository. These are text files, akin to README.md, where you can inform Codex how to navigate your codebase, which commands to run for testing, and how best to adhere to your project’s standard practices. Like human developers, Codex agents perform best when provided with configured dev environments, reliable testing setups, and clear documentation.
On coding evaluations and internal benchmarks, codex-1 shows strong performance even without AGENTS.md files or custom scaffolding.
Building safe and trustworthy agents
We’re releasing Codex as a research preview, in line with our iterative deployment strategy. We prioritized security and transparency when designing Codex so users can verify its outputs – a safeguard that grows increasingly more important as AI models handle more complex coding tasks independently and safety considerations evolve. Users can check Codex’s work through citations, terminal logs and test results. When uncertain or faced with test failures, the Codex agent explicitly communicates these issues, enabling users to make informed decisions about how to proceed. It still remains essential for users to manually review and validate all agent-generated code before integration and execution.
Aligning to human preferences
A primary goal while training codex-1 was to align outputs closely with human coding preferences and standards. Compared to OpenAI o3, codex-1 consistently produces cleaner patches ready for immediate human review and integration into standard workflows.
Consider the following model:“`python
from astropy.modeling import models as m
from astropy.modeling.separable import separability_matrix
cm = m.Linear1D(10) & m.Linear1D(5)
“`
It’s separability matrix as you might expect is a diagonal:
“`python
>>> separability_matrix(cm)
array([[ True, False],
[False, True]])
“`
If I make the model more complex:
“`python
>>> separability_matrix(m.Pix2Sky_TAN() & m.Linear1D(10) & m.Linear1D(5))
array([[ True, True, False, False],
[ True, True, False, False],
[False, False, True, False],
[False, False, False, True]])
“`
The output matrix is again, as expected, the outputs and inputs to the linear models are separable and independent of each other.
If however, I nest these compound models:
“`python
>>> separability_matrix(m.Pix2Sky_TAN() & cm)
array([[ True, True, False, False],
[ True, True, False, False],
[False, False, True, True],
[False, False, True, True]])
“`
Suddenly the inputs and outputs are no longer separable?
This feels like a bug to me, but I might be missing something?
| line number | line content |
|---|---|
|
@@ -242,7 +242,7 @@ def _cstack(left, right):
|
|
|
242242
|
cright = _coord_matrix(right, ‘right’, noutp)
|
|
243243
|
else:
|
|
244244
|
cright = np.zeros((noutp, right.shape[1]))
|
|
245
|
– cright[-right.shape[0]:, -right.shape[1]:] = 1
|
|
245
|
+ cright[-right.shape[0]:, -right.shape[1]:] = right
|
|
246246
|
|
|
247247
|
return np.hstack([cleft, cright])
|
| line number | line content |
|---|---|
|
@@ -148,3 +148,17 @@ def test_custom_model_separable():
|
|
|
148148
|
|
|
149149
|
assert not model_c().separable
|
|
150150
|
assert np.all(separability_matrix(model_c()) == [True, True])
|
|
151
|
+
|
|
152
|
+
|
|
153
|
+def test_nested_compound_model_separability():
|
|
154
|
+ “””Regression test for nested compound models in separability_matrix.”””
|
|
155
|
+ lin_compound = models.Linear1D(10) & models.Linear1D(5)
|
|
156
|
+ nested = models.Pix2Sky_TAN() & lin_compound
|
|
157
|
+ expected = np.array([
|
|
158
|
+ [True, True, False, False],
|
|
159
|
+ [True, True, False, False],
|
|
160
|
+ [False, False, True, False],
|
|
161
|
+ [False, False, False, True],
|
|
162
|
+ ])
|
|
163
|
+ result = separability_matrix(nested)
|
|
164
|
+ assert_allclose(result, expected)
|
| line number | line content |
|---|---|
|
@@ -241,8 +241,26 @@ def _cstack(left, right):
|
|
|
241241
|
if isinstance(right, Model):
|
|
242242
|
cright = _coord_matrix(right, ‘right’, noutp)
|
|
243243
|
else:
|
|
244
|
+ # Insert the separability information contained in the right-hand
|
|
245
|
+ # operand into the bottom-right corner of the combined matrix.
|
|
246
|
+ #
|
|
247
|
+ # Prior to this change the implementation *discarded* the actual
|
|
248
|
+ # separability matrix of the right operand and replaced it with an
|
|
249
|
+ # array of ones. This effectively marked every output that originated
|
|
250
|
+ # from the right‑hand side as depending on *all* of its inputs, i.e.
|
|
251
|
+ # it treated the nested model as completely non‑separable. When the
|
|
252
|
+ # right operand was itself a compound model this led to overly
|
|
253
|
+ # conservative (and therefore incorrect) separability matrices—for
|
|
254
|
+ # example when combining an already analysed compound model with the
|
|
255
|
+ # “&“ operator, as reported in gh‑issue #xxxx (see regression tests
|
|
256
|
+ # added alongside this fix).
|
|
257
|
+ #
|
|
258
|
+ # The correct behaviour is analogous to the handling of the *left*
|
|
259
|
+ # array operand a few lines above: we should embed the pre‑computed
|
|
260
|
+ # separability matrix of the right operand into the appropriate slice
|
|
261
|
+ # of the result without altering it.
|
|
244262
|
cright = np.zeros((noutp, right.shape[1]))
|
|
245
|
– cright[-right.shape[0]:, -right.shape[1]:] = 1
|
|
263
|
+ cright[-right.shape[0]:, -right.shape[1]:] = right
|
|
246264
|
|
|
247265
|
return np.hstack([cleft, cright])
|
| line number | line content |
|---|---|
|
1
|
+“””Tests for the separability_matrix utility.
|
|
2
|
+
|
|
3
|
+This file adds a regression test for the bug discussed in
|
|
4
|
+astropy/astropy#14966 (see also the accompanying change in
|
|
5
|
+“astropy.modeling.separable._cstack“).
|
|
6
|
+
|
|
7
|
+The failure was triggered when computing the separability matrix for a
|
|
8
|
+compound model where the right‑hand side of an “&“ operation was *itself*
|
|
9
|
+another compound model. In that case the implementation treated the nested
|
|
10
|
+model as completely non‑separable, resulting in a matrix that incorrectly
|
|
11
|
+reported dependencies between all of its outputs and inputs.
|
|
12
|
+
|
|
13
|
+The test below reproduces the example from the original bug report and makes
|
|
14
|
+sure that the corrected implementation returns the expected block‑diagonal
|
|
15
|
+matrix.
|
|
16
|
+“””
|
|
17
|
+
|
|
18
|
+import numpy as np
|
|
19
|
+
|
|
20
|
+
|
|
21
|
+from astropy.modeling import models as m
|
|
22
|
+from astropy.modeling.separable import separability_matrix
|
|
23
|
+
|
|
24
|
+
|
|
25
|
+def test_nested_compound_model_separability():
|
|
26
|
+ “””Ensure separability_matrix works for nested compound models.”””
|
|
27
|
+
|
|
28
|
+ # A simple separable compound model consisting of two independent 1‑D
|
|
29
|
+ # linear transformations.
|
|
30
|
+ cm = m.Linear1D(10) & m.Linear1D(5)
|
|
31
|
+
|
|
32
|
+ # Combine the separable compound model with a *non‑separable* two‑dimensional
|
|
33
|
+ # TAN projection. The projection goes on the left‑hand side of the “&“
|
|
34
|
+ # operator while the nested compound model “cm“ is on the right.
|
|
35
|
+ nested = m.Pix2Sky_TAN() & cm
|
|
36
|
+
|
|
37
|
+ # The expected correlation matrix is block‑diagonal: the two outputs of
|
|
38
|
+ # the TAN projection depend on *both* of its inputs, while the two outputs
|
|
39
|
+ # of the nested linear model each depend on *only one* of their inputs.
|
|
40
|
+ expected = np.array(
|
|
41
|
+ [
|
|
42
|
+ [True, True, False, False],
|
|
43
|
+ [True, True, False, False],
|
|
44
|
+ [False, False, True, False],
|
|
45
|
+ [False, False, False, True],
|
|
46
|
+ ]
|
|
47
|
+ )
|
|
48
|
+
|
|
49
|
+ calculated = separability_matrix(nested)
|
|
50
|
+
|
|
51
|
+ assert calculated.shape == expected.shape
|
|
52
|
+ assert np.array_equal(calculated, expected)
|
### Bug summaryWindows correction is not correct in `mlab._spectral_helper`:
https://github.com/matplotlib/matplotlib/blob/3418bada1c1f44da1f73916c5603e3ae79fe58c1/lib/matplotlib/mlab.py#L423-L430
The `np.abs` is not needed, and give wrong result for window with negative value, such as `flattop`.
For reference, the implementation of scipy can be found here :
https://github.com/scipy/scipy/blob/d9f75db82fdffef06187c9d8d2f0f5b36c7a791b/scipy/signal/_spectral_py.py#L1854-L1859
### Code for reproduction
“`python
import numpy as np
from scipy import signal
window = signal.windows.flattop(512)
print(np.abs(window).sum()**2-window.sum()**2)
“`
### Actual outcome
4372.942556173262
### Expected outcome
0
### Additional information
_No response_
### Operating system
_No response_
### Matplotlib Version
latest
### Matplotlib Backend
_No response_
### Python version
_No response_
### Jupyter version
_No response_
### Installation
None
| line number | line content |
|---|---|
|
@@ -424,10 +424,10 @@ def _spectral_helper(x, y=None, NFFT=None, Fs=None, detrend_func=None,
|
|
|
424424
|
result /= Fs
|
|
425425
|
# Scale the spectrum by the norm of the window to compensate for
|
|
426426
|
# windowing loss; see Bendat & Piersol Sec 11.5.2.
|
|
427
|
– result /= (np.abs(window)**2).sum()
|
|
427
|
+ result /= (window.conjugate() * window).sum()
|
|
428428
|
else:
|
|
429429
|
# In this case, preserve power in the segment, not amplitude
|
|
430
|
– result /= np.abs(window).sum()**2
|
|
430
|
+ result /= window.sum()**2
|
|
431431
|
|
|
432432
|
t = np.arange(NFFT/2, len(x) – NFFT/2 + 1, NFFT – noverlap)/Fs
|
| line number | line content |
|---|---|
|
@@ -715,6 +715,32 @@ class TestSpectral:
|
|
|
715715
|
spec_n/self.Fs*win.sum()**2,
|
|
716716
|
atol=1e-08)
|
|
717717
|
|
|
718
|
+ def test_psd_windowarray_negative(self):
|
|
719
|
+ win = np.array([-1.0, 0.5, 0.5, 1.0])
|
|
720
|
+
|
|
721
|
+ y = self.y[:len(win)]
|
|
722
|
+
|
|
723
|
+ spec_s, fsp_s = mlab.psd(x=y,
|
|
724
|
+ NFFT=len(win),
|
|
725
|
+ Fs=self.Fs,
|
|
726
|
+ noverlap=0,
|
|
727
|
+ pad_to=len(win),
|
|
728
|
+ sides=self.sides,
|
|
729
|
+ window=lambda x: win,
|
|
730
|
+ scale_by_freq=True)
|
|
731
|
+ spec_n, fsp_n = mlab.psd(x=y,
|
|
732
|
+ NFFT=len(win),
|
|
733
|
+ Fs=self.Fs,
|
|
734
|
+ noverlap=0,
|
|
735
|
+ pad_to=len(win),
|
|
736
|
+ sides=self.sides,
|
|
737
|
+ window=lambda x: win,
|
|
738
|
+ scale_by_freq=False)
|
|
739
|
+ assert_array_equal(fsp_s, fsp_n)
|
|
740
|
+ assert_allclose(spec_s*(win.conjugate() * win).sum(),
|
|
741
|
+ spec_n/self.Fs*win.sum()**2,
|
|
742
|
+ atol=1e-08)
|
|
743
|
+
|
|
718744
|
|
|
719745
|
“kind”, [“complex”, “magnitude”, “angle”, “phase”]
|
|
720746
|
def test_spectrum(self, kind):
|
| line number | line content |
|---|---|
|
@@ -395,12 +395,23 @@ def _spectral_helper(x, y=None, NFFT=None, Fs=None, detrend_func=None,
|
|
|
395395
|
elif mode == ‘psd’:
|
|
396396
|
result = np.conj(result) * result
|
|
397397
|
elif mode == ‘magnitude’:
|
|
398
|
– result = np.abs(result) / np.abs(window).sum()
|
|
398
|
+ # For the magnitude spectrum we need to normalise by the *sum* of the
|
|
399
|
+ # window to compensate for the change in overall signal level caused
|
|
400
|
+ # by windowing. Using “np.abs(window)“ here would incorrectly
|
|
401
|
+ # double‑count negative lobes of some windows (e.g., *flattop*) when
|
|
402
|
+ # they are squared later in power calculations, but for the magnitude
|
|
403
|
+ # spectrum we must also ensure that the normalisation factor is
|
|
404
|
+ # positive so that the returned magnitudes remain non‑negative (as
|
|
405
|
+ # they will be passed through “np.log10“ when “scale=”dB”“). We
|
|
406
|
+ # therefore take the absolute value *after* summing the window.
|
|
407
|
+ result = np.abs(result) / np.abs(window.sum())
|
|
399408
|
elif mode == ‘angle’ or mode == ‘phase’:
|
|
400409
|
# we unwrap the phase later to handle the onesided vs. twosided case
|
|
401410
|
result = np.angle(result)
|
|
402411
|
elif mode == ‘complex’:
|
|
403
|
– result /= np.abs(window).sum()
|
|
412
|
+ # Apply the same normalisation as for the magnitude spectrum (but
|
|
413
|
+ # without taking an absolute value of the result itself).
|
|
414
|
+ result /= np.abs(window.sum())
|
|
404415
|
|
|
405416
|
if mode == ‘psd’:
|
|
406417
|
|
|
@@ -424,10 +435,20 @@ def _spectral_helper(x, y=None, NFFT=None, Fs=None, detrend_func=None,
|
|
|
424435
|
result /= Fs
|
|
425436
|
# Scale the spectrum by the norm of the window to compensate for
|
|
426437
|
# windowing loss; see Bendat & Piersol Sec 11.5.2.
|
|
427
|
– result /= (np.abs(window)**2).sum()
|
|
438
|
+ # Scale the spectrum by the *power* of the window to compensate
|
|
439
|
+ # for windowing loss (Bendat & Piersol Sec 11.5.2). The power is
|
|
440
|
+ # proportional to the *square* of the window, so we should sum
|
|
441
|
+ # “window ** 2“ – taking the absolute value first would
|
|
442
|
+ # mistakenly treat negative window coefficients as positive and
|
|
443
|
+ # thus over‑estimate the power for windows that are not strictly
|
|
444
|
+ # non‑negative (again, the *flattop* window is a common example).
|
|
445
|
+ result /= (window ** 2).sum()
|
|
428446
|
else:
|
|
429447
|
# In this case, preserve power in the segment, not amplitude
|
|
430
|
– result /= np.abs(window).sum()**2
|
|
448
|
+ # Preserve the power in the segment (rather than the amplitude).
|
|
449
|
+ # The correct normalisation is by the square of the sum of the
|
|
450
|
+ # window, *without* an absolute value – see the discussion above.
|
|
451
|
+ result /= window.sum() ** 2
|
|
431452
|
|
|
432453
|
t = np.arange(NFFT/2, len(x) – NFFT/2 + 1, NFFT – noverlap)/Fs
|
Description class Experiment(models.Model): estimated_time = models.DurationField() list(Experiment.objects.annotate(duration=F(‘estimated_time’) + datime.timedelta(1))) Traceback (most recent call last): File “/home/sergey/dev/django/tests/expressions/tests.py”, line 1218, in test_duration_expressions list(Experiment.objects.annotate(duration=F(‘estimated_time’) + delta)) File “/home/sergey/dev/django/django/db/models/query.py”, line 269, in __iter__ self._fetch_all() File “/home/sergey/dev/django/django/db/models/query.py”, line 1172, in _fetch_all self._result_cache = list(self._iterable_class(self)) File “/home/sergey/dev/django/django/db/models/query.py”, line 63, in __iter__ for row in compiler.results_iter(results): File “/home/sergey/dev/django/django/db/models/sql/compiler.py”, line 998, in apply_converters value = converter(value, expression, connection) File “/home/sergey/dev/django/django/db/backends/base/operations.py”, line 571, in convert_durationfield_value value = str(decimal.Decimal(value) / decimal.Decimal(1000000)) decimal.InvalidOperation: []
| line number | line content |
|---|---|
|
@@ -8,6 +8,7 @@ from django.conf import settings
|
|
|
88
|
from django.db import NotSupportedError, transaction
|
|
99
|
from django.db.backends import utils
|
|
1010
|
from django.utils import timezone
|
|
11
|
+from django.utils.dateparse import parse_duration
|
|
1112
|
from django.utils.encoding import force_str
|
|
1213
|
|
|
1314
|
|
|
@@ -579,8 +580,21 @@ class BaseDatabaseOperations:
|
|
|
579580
|
return []
|
|
580581
|
|
|
581582
|
def convert_durationfield_value(self, value, expression, connection):
|
|
582
|
– if value is not None:
|
|
583
|
– return datetime.timedelta(0, 0, value)
|
|
583
|
+ if value is None:
|
|
584
|
+ return None
|
|
585
|
+ if isinstance(value, datetime.timedelta):
|
|
586
|
+ return value
|
|
587
|
+ if isinstance(value, str):
|
|
588
|
+ parsed = parse_duration(value)
|
|
589
|
+ if parsed is not None:
|
|
590
|
+ return parsed
|
|
591
|
+ try:
|
|
592
|
+ microseconds = int(value)
|
|
593
|
+ except (TypeError, ValueError, decimal.DecimalException):
|
|
594
|
+ pass
|
|
595
|
+ else:
|
|
596
|
+ return datetime.timedelta(microseconds=microseconds)
|
|
597
|
+ raise ValueError(“Invalid duration value ‘%s'” % value)
|
|
584598
|
|
|
585599
|
def check_expression_support(self, expression):
|
|
586600
|
“””
|
| line number | line content |
|---|---|
|
@@ -487,8 +487,18 @@ class DurationExpression(CombinedExpression):
|
|
|
487487
|
pass
|
|
488488
|
else:
|
|
489489
|
if output.get_internal_type() == ‘DurationField’:
|
|
490
|
– sql, params = compiler.compile(side)
|
|
491
|
– return connection.ops.format_for_duration_arithmetic(sql), params
|
|
490
|
+ # Only format DurationField expressions when combined with
|
|
491
|
+ # date/time types.
|
|
492
|
+ other = self.rhs if side is self.lhs else self.lhs
|
|
493
|
+ try:
|
|
494
|
+ other_output = other.output_field
|
|
495
|
+ except FieldError:
|
|
496
|
+ other_output = None
|
|
497
|
+ if other_output and other_output.get_internal_type() in {
|
|
498
|
+ ‘DateField’, ‘DateTimeField’, ‘TimeField’
|
|
499
|
+ }:
|
|
500
|
+ sql, params = compiler.compile(side)
|
|
501
|
+ return connection.ops.format_for_duration_arithmetic(sql), params
|
|
492502
|
return compiler.compile(side)
|
|
493503
|
|
|
494504
|
def as_sql(self, compiler, connection):
|
| line number | line content |
|---|---|
|
@@ -1468,6 +1468,12 @@ class FTimeDeltaTests(TestCase):
|
|
|
14681468
|
))
|
|
14691469
|
self.assertIsNone(queryset.first().shifted)
|
|
14701470
|
|
|
1471
|
+ def test_durationfield_only_expression(self):
|
|
1472
|
+ delta = datetime.timedelta(days=1)
|
|
1473
|
+ experiments = Experiment.objects.annotate(duration=F(‘estimated_time’) + delta).order_by(‘name’)
|
|
1474
|
+ for e in experiments:
|
|
1475
|
+ self.assertEqual(e.duration, e.estimated_time + delta)
|
|
1476
|
+
|
|
14711477
|
‘supports_temporal_subtraction’
|
|
14721478
|
def test_date_subtraction(self):
|
|
14731479
|
queryset = Experiment.objects.annotate(
|
| line number | line content |
|---|---|
|
@@ -579,8 +579,87 @@ class BaseDatabaseOperations:
|
|
|
579579
|
return []
|
|
580580
|
|
|
581581
|
def convert_durationfield_value(self, value, expression, connection):
|
|
582
|
– if value is not None:
|
|
583
|
– return datetime.timedelta(0, 0, value)
|
|
582
|
+ “””Convert a value as returned by the database to a “timedelta“.
|
|
583
|
+
|
|
584
|
+ Different database backends return different data types for
|
|
585
|
+ “DurationField“ (and “timedelta“ expressions):
|
|
586
|
+
|
|
587
|
+ * PostgreSQL returns a “datetime.timedelta“ instance.
|
|
588
|
+ * The built‑in SQLite implementation (see
|
|
589
|
+ “django_format_dtdelta“ in “django.db.backends.sqlite3.base“)
|
|
590
|
+ returns the string produced by “str(timedelta)“, e.g. “’2 days, 0:00:00’“.
|
|
591
|
+ * MySQL and SQLite can also return an integer (or the string
|
|
592
|
+ representation of one) containing the number of *microseconds*.
|
|
593
|
+
|
|
594
|
+ Historically Django assumed the microseconds representation and
|
|
595
|
+ tried to build a new “timedelta“ directly from it. That failed
|
|
596
|
+ whenever a backend returned something else (e.g. the string
|
|
597
|
+ representation mentioned above) which, in turn, broke duration‑
|
|
598
|
+ only expressions such as “F(‘estimated_time’) + timedelta(days=1)“
|
|
599
|
+ on SQLite and MySQL (#34253).
|
|
600
|
+
|
|
601
|
+ To be backend‑agnostic, handle the common return types explicitly:
|
|
602
|
+
|
|
603
|
+ 1. “None“ is preserved so that NULLs remain NULL.
|
|
604
|
+ 2. “datetime.timedelta“ is returned unchanged.
|
|
605
|
+ 3. “int“, “float“ and “Decimal“ are interpreted as a number
|
|
606
|
+ of microseconds.
|
|
607
|
+ 4. “bytes“ are decoded to “str“ and handled as below.
|
|
608
|
+ 5. “str“ is first parsed with :pyfunc:`django.utils.dateparse.parse_duration`.
|
|
609
|
+ If that succeeds the resulting “timedelta“ is used. Otherwise
|
|
610
|
+ it is assumed to be a stringified integer of microseconds.
|
|
611
|
+ “””
|
|
612
|
+
|
|
613
|
+ import decimal
|
|
614
|
+ from django.utils.dateparse import parse_duration
|
|
615
|
+
|
|
616
|
+ if value is None:
|
|
617
|
+ return None
|
|
618
|
+
|
|
619
|
+ # 1. Already a timedelta – nothing to do.
|
|
620
|
+ if isinstance(value, datetime.timedelta):
|
|
621
|
+ return value
|
|
622
|
+
|
|
623
|
+ # 2. Numeric types => microseconds.
|
|
624
|
+ if isinstance(value, (int, float, decimal.Decimal)):
|
|
625
|
+ # “datetime.timedelta“ only accepts integers for the
|
|
626
|
+ # *microseconds* argument. Convert explicitly.
|
|
627
|
+ return datetime.timedelta(microseconds=int(value))
|
|
628
|
+
|
|
629
|
+ # 3. Bytes – decode and continue as string.
|
|
630
|
+ if isinstance(value, (bytes, bytearray)):
|
|
631
|
+ try:
|
|
632
|
+ value = value.decode()
|
|
633
|
+ except Exception:
|
|
634
|
+ # Fallback – can’t decode, return the original value.
|
|
635
|
+ return value
|
|
636
|
+
|
|
637
|
+ # 4. String handling.
|
|
638
|
+ if isinstance(value, str):
|
|
639
|
+ # First, try to interpret the string as a bare integer number of
|
|
640
|
+ # microseconds. Some databases (notably MySQL) return the result
|
|
641
|
+ # of temporal arithmetic as numeric strings. Attempting this
|
|
642
|
+ # before “parse_duration()“ avoids mis‑interpreting large
|
|
643
|
+ # microsecond values as *seconds* (see #34253).
|
|
644
|
+ try:
|
|
645
|
+ micros = int(value)
|
|
646
|
+ except (TypeError, ValueError):
|
|
647
|
+ micros = None
|
|
648
|
+
|
|
649
|
+ if micros is not None:
|
|
650
|
+ return datetime.timedelta(microseconds=micros)
|
|
651
|
+
|
|
652
|
+ # Otherwise, attempt to parse the standard/ISO 8601/PostgreSQL
|
|
653
|
+ # interval representations that “parse_duration“ understands.
|
|
654
|
+ td = parse_duration(value)
|
|
655
|
+ if td is not None:
|
|
656
|
+ return td
|
|
657
|
+
|
|
658
|
+ # Fallback – leave unchanged.
|
|
659
|
+ return value
|
|
660
|
+
|
|
661
|
+ # Unknown type – return unchanged (best effort).
|
|
662
|
+ return value
|
|
584663
|
|
|
585664
|
def check_expression_support(self, expression):
|
|
586665
|
“””
|
Action Performed:
Prerequisites: Create a WS and add two employees to it
Steps:
Open NewExpensify app
Log in with a WS administrator account
Go to the account settings
Go to the Troubleshoot menu
Click on “Clear cache and restart” and clear the cache
Go back to the LHN Inbox
Expected Result:
Members’ room names should be updated and display the room name in LHN after the cache is deleted
Actual Result:
Members’ room names are not updated in LHN after cache deletion
Workaround:
Unknown
| line number | line content |
|---|---|
|
@@ -3817,7 +3817,7 @@ const reportNameCache = new Map<string, {lastVisibleActionCreated: string; repor
|
|
|
38173817
|
/**
|
|
38183818
|
* Get a cache key for the report name.
|
|
38193819
|
*/
|
|
3820
|
–const getCacheKey = (report: OnyxEntry): string => `${report?.reportID}-${report?.lastVisibleActionCreated}-${report?.reportName}`;
|
|
3820
|
+const getCacheKey = (report: OnyxEntry, policyName: string): string => `${report?.reportID}-${report?.lastVisibleActionCreated}-${report?.reportName}-${policyName}`;
|
|
38213821
|
|
|
38223822
|
/**
|
|
38233823
|
* Get the title for a report.
|
|
@@ -3830,12 +3830,12 @@ function getReportName(
|
|
|
38303830
|
invoiceReceiverPolicy?: OnyxEntry,
|
|
38313831
|
): string {
|
|
38323832
|
const reportID = report?.reportID;
|
|
3833
|
– const cacheKey = getCacheKey(report);
|
|
3833
|
+ const policyName = getPolicyName(report, false, policy);
|
|
3834
|
+ const cacheKey = getCacheKey(report, policyName);
|
|
38343835
|
|
|
38353836
|
if (reportID) {
|
|
38363837
|
const reportNameFromCache = reportNameCache.get(cacheKey);
|
|
3837
|
–
|
|
3838
|
– if (reportNameFromCache?.reportName && reportNameFromCache.reportName === report?.reportName) {
|
|
3838
|
+ if (reportNameFromCache?.reportName) {
|
|
38393839
|
return reportNameFromCache.reportName;
|
|
38403840
|
}
|
|
38413841
|
}
|
| line number | line content |
|---|---|
|
@@ -562,6 +562,21 @@ let isAnonymousUser = false;
|
|
|
562562
|
// Example case: when we need to get a report name of a thread which is dependent on a report action message.
|
|
563563
|
const parsedReportActionMessageCache: Record = {};
|
|
564564
|
|
|
565
|
+/**
|
|
566
|
+ * Cache of computed report names keyed by `${reportID}-${lastVisibleActionCreated}-${reportName}`.
|
|
567
|
+ *
|
|
568
|
+ * The cache is **intentionally** declared close to the top of the module so that it is already
|
|
569
|
+ * defined when we register the Onyx listener for the policy collection further below. The listener
|
|
570
|
+ * clears this cache when policies are updated in order to ensure that room titles that depend on
|
|
571
|
+ * the policy name (eg. *Members* or *#admins* rooms) are recalculated with the latest data.
|
|
572
|
+ */
|
|
573
|
+// NOTE: `reportNameCache` is now declared near the top of this file to ensure it is available to
|
|
574
|
+// the policy listener that needs to clear it when the collection updates. The declaration
|
|
575
|
+// here has been removed to avoid shadowing/duplicate‑declaration errors.
|
|
576
|
+
|
|
577
|
+// eslint-disable-next-line @typescript-eslint/prefer-readonly-parameter-types
|
|
578
|
+const reportNameCache = new Map();
|
|
579
|
+
|
|
565580
|
const defaultAvatarBuildingIconTestID = ‘SvgDefaultAvatarBuilding Icon’;
|
|
566581
|
Onyx.connect({
|
|
567582
|
key: ONYXKEYS.SESSION,
|
|
@@ -598,10 +613,37 @@ Onyx.connect({
|
|
|
598613
|
});
|
|
599614
|
|
|
600615
|
let allPolicies: OnyxCollection;
|
|
616
|
+/**
|
|
617
|
+ * Keep a local reference to the policy collection so we can use it when computing
|
|
618
|
+ * report names.
|
|
619
|
+ *
|
|
620
|
+ * IMPORTANT: A report title for policy rooms (e.g. *#admins*, *#announce*, the automatically
|
|
621
|
+ * generated *Members* room, Policy Expense chats, etc.) depends on the *policy name*.
|
|
622
|
+ * When the app starts with an empty cache we will first calculate the report name **before**
|
|
623
|
+ * the policy list is fetched from the server. That interim calculation is cached in
|
|
624
|
+ * `reportNameCache` so that we do not need to re‑compute the name every time the LHN renders.
|
|
625
|
+ *
|
|
626
|
+ * Once the policy information arrives we **must** clear that cache, otherwise the LHN will
|
|
627
|
+ * continue to display the stale title that was generated without a policy name. This is the
|
|
628
|
+ * root cause of Expensify/App#27948 – *“Members’ room names are not updated in LHN after cache
|
|
629
|
+ * deletion”*.
|
|
630
|
+ */
|
|
601631
|
Onyx.connect({
|
|
602632
|
key: ONYXKEYS.COLLECTION.POLICY,
|
|
603633
|
waitForCollectionCallback: true,
|
|
604
|
– callback: (value) => (allPolicies = value),
|
|
634
|
+ callback: (value) => {
|
|
635
|
+ // Update the reference used throughout ReportUtils
|
|
636
|
+ allPolicies = value;
|
|
637
|
+
|
|
638
|
+ /**
|
|
639
|
+ * Clear the cached report names so that any subsequent call to `getReportName` will use the
|
|
640
|
+ * most up‑to‑date policy data. We don’t attempt to perform a more granular invalidation
|
|
641
|
+ * because the size of the cache is tiny (max number of reports) and the cost of
|
|
642
|
+ * recalculating a name is negligible compared to the correctness issues caused by stale
|
|
643
|
+ * data.
|
|
644
|
+ */
|
|
645
|
+ reportNameCache.clear();
|
|
646
|
+ },
|
|
605647
|
});
|
|
606648
|
|
|
607649
|
let allBetas: OnyxEntry;
|
|
@@ -3812,7 +3854,9 @@ function getInvoicesChatName(report: OnyxEntry, receiverPolicy: OnyxEntr
|
|
|
38123854
|
return getPolicyName(report, false, invoiceReceiverPolicy);
|
|
38133855
|
}
|
|
38143856
|
|
|
3815
|
–const reportNameCache = new Map();
|
|
3857
|
+// `reportNameCache` is declared near the top of this file. This legacy declaration has been
|
|
3858
|
+// removed to prevent duplicate constant definitions.
|
|
3859
|
+// const reportNameCache = new Map();
|
|
38163860
|
|
|
38173861
|
/**
|
|
38183862
|
* Get a cache key for the report name.
|
Preventing abuse
Safeguarding against malicious applications of AI-driven software engineering, such as malware development, is increasingly critical. At the same time, it’s important that protective measures do not unduly hinder legitimate and beneficial applications that may involve techniques sometimes also used for malware development, such as low level kernel engineering.
To balance safety and utility, Codex was trained to identify and precisely refuse requests aimed at development of malicious software, while clearly distinguishing and supporting legitimate tasks. We’ve also enhanced our policy frameworks and incorporated rigorous safety evaluations to reinforce these boundaries effectively. We’ve published an addendum to the o3 System Card to reflect these evaluations.
Secure execution
The Codex agent operates entirely within a secure, isolated container in the cloud. During task execution, internet access is disabled, limiting the agent’s interaction solely to the code explicitly provided via GitHub repositories and pre-installed dependencies configured by the user via a setup script. The agent cannot access external websites, APIs, or other services.
Early use cases
Technical teams at OpenAI have started using Codex as part of their daily toolkit. It is most often used by OpenAI engineers to offload repetitive, well-scoped tasks, like refactoring, renaming, and writing tests, that would otherwise break focus. It’s equally useful for scaffolding new features, wiring components, fixing bugs, and drafting documentation. Teams are building new habits around it: triaging on-call issues, planning tasks at the start of the day, and offloading background work to keep moving. By reducing context-switching and surfacing forgotten to-dos, Codex helps engineers ship faster and stay focused on what matters most.
00:0000:00
00:0000:00
00:0000:00
Leading up to release, we’ve also been working with a small group of external testers to better understand how Codex performs across diverse codebases, development processes, and teams.
- Cisco(opens in a new window) is exploring how Codex can help their engineering teams bring ambitious ideas to life faster. As early design partners, Cisco is helping shape the future of Codex by evaluating it for real-world use cases across their product portfolio and providing feedback to the OpenAI team.
- Temporal(opens in a new window) uses Codex to accelerate feature development, debug issues, write and execute tests, and refactor large codebases. It also helps them stay focused by running complex tasks in the background—keeping engineers in flow while speeding up iteration.
- Superhuman(opens in a new window) uses Codex to speed up small but repetitive tasks like improving test coverage and fixing integration failures. It also helps them ship faster by enabling product managers to contribute lightweight code changes without pulling in an engineer, except for code review.
- Kodiak(opens in a new window) is using Codex to help write debugging tools, improve test coverage, and refactor code—accelerating development of the Kodiak Driver, their autonomous driving technology. Codex has also become a valuable reference tool, helping engineers understand unfamiliar parts of the stack by surfacing relevant context and past changes.
Based on learnings from early testers, we recommend assigning well-scoped tasks to multiple agents simultaneously, and experimenting with different types of tasks and prompts to explore the model’s capabilities effectively.
Updates to Codex CLI
Last month, we launched Codex CLI, a lightweight open-source coding agent that runs in your terminal. It brings the power of models like o3 and o4-mini into your local workflow, making it easy to pair with them to complete tasks faster.
Today, we’re also releasing a smaller version of codex-1, a version of o4-mini designed specifically for use in Codex CLI. This new model supports faster workflows in the CLI and is optimized for low-latency code Q&A and editing, while retaining the same strengths in instruction following and style. It’s available now as the default model in Codex CLI and in the API as codex-mini-latest. The underlying snapshot will be regularly updated as we continue to improve the Codex-mini model.
We’re also making it much easier to connect your developer account to Codex CLI. Instead of manually generating and configuring an API token, you can now sign in with your ChatGPT account and select the API organization you want to use. We’ll automatically generate and configure the API key for you. Plus and Pro users who sign in to Codex CLI with ChatGPT can also begin redeeming $5 and $50 in free API credits, respectively, later today for the next 30 days.
Codex availability, pricing, and limitations
Starting today, we’re rolling out Codex to ChatGPT Pro, Enterprise, and Team users globally, with support for Plus and Edu coming soon. Users will have generous access at no additional cost for the coming weeks so you can explore what Codex can do, after which we’ll roll out rate-limited access and flexible pricing options that let you purchase additional usage on-demand. We plan to expand access to Plus and Edu users soon.
For developers building with codex-mini-latest, the model is available on the Responses API and priced at $1.50 per 1M input tokens and $6 per 1M output tokens, with a 75% prompt caching discount.
Codex is still early in its development. As a research preview, it currently lacks features like image inputs for frontend work, and the ability to course-correct the agent while it’s working. Additionally, delegating to a remote agent takes longer than interactive editing, which can take some getting used to. Over time, interacting with Codex agents will increasingly resemble asynchronous collaboration with colleagues. As model capabilities advance, we anticipate agents handling more complex tasks over extended periods.
What’s next
We imagine a future where developers drive the work they want to own and delegate the rest to agents—moving faster and being more productive with AI. To achieve that, we’re building a suite of Codex tools that support both real-time collaboration and asynchronous delegation.
Pairing with AI tools like Codex CLI and others has quickly become an industry norm, helping developers move faster as they code. But we believe the asynchronous, multi-agent workflow introduced by Codex in ChatGPT will become the de facto way engineers produce high-quality code.
Ultimately, we see these two modes of interaction—real-time pairing and task delegation—converging. Developers will collaborate with AI agents across their IDEs and everyday tools to ask questions, get suggestions, and offload longer tasks, all in a unified workflow.
Looking ahead, we plan to introduce more interactive and flexible agent workflows. Developers will soon be able to provide guidance mid-task, collaborate on implementation strategies, and receive proactive progress updates. We also envision deeper integrations across the tools you already use: today Codex connects with GitHub, and soon you’ll be able to assign tasks from Codex CLI, ChatGPT Desktop, or even tools such as your issue tracker or CI system.
Software engineering is one of the first industries to experience significant AI-driven productivity gains, opening new possibilities for individuals and small teams. While we’re optimistic about these gains, we’re also collaborating with partners to better understand the implications of widespread agent adoption on developer workflows, skill development across people, skill levels, and geographies.
This is just the beginning—and we’re excited to see what you build with Codex.
Livestream replay

Appendix
System message
We are sharing the codex-1 system message to help developers understand the model’s default behavior and tailor Codex to work effectively in custom workflows. For example, the codex-1 system message encourages Codex to run all tests mentioned in the AGENTS.md file, but if you’re short on time, you can ask Codex to skip these tests.
[ad_2]